The main steps for getting started with development for Tyro iClient are as given below:
- Checking for Prerequisites.
- Including the iClient JavaScript library.
- Pairing to the integration server simulator.
- Registering your Point-of-Sales software.
When completing step 4, please refer to the specific criteria pertaining to the POS Information fields and the API key configuration.
Please refer to the iClient API for a sample HealthPoint claiming code. After downloading the zip folder, unzip it and click on the iclient-api folder, and then index. At the top left corner underneath the APIs, click on Classes, and then click on TYRO.IClientWithUI, scroll down until you see the index and method tabs, then click on index.
Before getting started, please ensure that the following prerequisites are met:
- Please use a compatible browser for your development.
- Please note that Tyro iClient is only compatible with the following browsers:
- Google Chrome.
- Mozilla Firefox.
- Safari.
- Microsoft Internet Explorer.
- Microsoft Edge.
- Additionally, when using the integration server simulator, you will also need your allocated Merchant ID (MID) and Terminal ID (TID) combination to pair with the integration server simulator. Please reach out to the POS Integration team via email and they will provide the allocated pairing credentials.
The following steps can be followed:
- Headful iClient
<script type="text/javascript" src="{Base URL}/iclient-with-ui-v1.js"></script>- Headless iClient
<script type="text/javascript" src="{Base URL}/iclient-v1.js"></script>During testing and development, you will need to have the base URL set to https://iclientsimulator.test.tyro.com
During testing and development, you will need to have the base URL set to https://iclientsimulator.test.tyro.com
The simulator uses pre-configured magic values to replicate specific scenarios in the transaction lifecycle; these can be found here
Once certified and live, your POS integration will then use this URL https://iclient.tyro.com as the base URL.
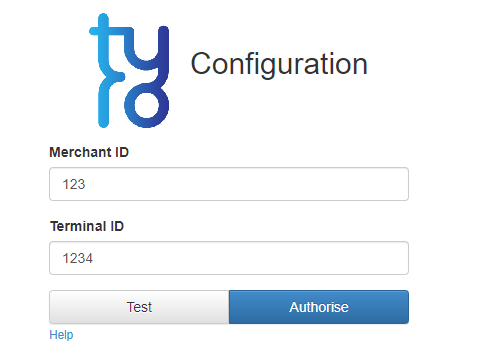
The pairing process uses a merchant ID and terminal ID combination. This will be provided to you by the Tyro POS integration team.
- The pairing request is initiated from an embedded pairing URL (as shown in the below image. This configuration page has to be embedded in an iframe in the POS.), this can be found here, once you start a pairing request it will need to be confirmed physically on the terminal, the pairing page will then get a response confirming the pairing.
- If the user clears local storage in the browser the pairing details will be deleted and the terminal will need to be re-paired.
When using iClient, you must register your POS software using our POSInformation method ensuring that the correct and relevant information pertaining to your POS integration is returned to the Tyro servers in the integration requests. This helps us identify integration requests and aids our support team in resolving any issues that may come up in production. The specification and example for Headful and Headless iClient is given below.
Specification:
TYRO.IClientWithUI(apiKey, posProductData)
Parameters:
- apiKey (String) - The API key provided by Tyro. (not validated in test environments)
- posProductData - An object containing the following properties (final values to be confirmed by Tyro):
| Parameter | Type | Description | Required |
|---|---|---|---|
| posProductVendor | String | Name of your company. | Yes |
| posProductName | String | Name of your product. | Yes |
| posProductVersion | String | Version of your product. | Yes |
Example:
var iclient = new TYRO.IClientWithUI("apiKey", {posProductVendor: "Awesome POS CO",
posProductName: "AwesomePOS", posProductVersion: "1.0.1"}); Specification:
TYRO.IClient(apiKey, posProductData)
Parameters:
- apiKey (String)- The API key provided by Tyro (not validated in test environments).
- posProductData - An object containing the following properties (final values to be confirmed by Tyro):
| Parameter | Type | Description | Required |
|---|---|---|---|
| posProductVendor | String | Name of your company. | Yes |
| posProductName | String | Name of your product. | Yes |
| posProductVersion | String | Version of your product. | Yes |
All parameters are mandatory.
Below is a JSFiddle example that demonstrates the POS information being set in the method and then being retrieved from the iClient object and displayed when the “Show POS Information” button is clicked.